
One Way Degassing Valves: Essential Protection for Roasted Coffee Bags
Struggling with puffy coffee bags, burst seals, or flat-tasting beans after shipping?
You’re not the first, and you won’t be the last. Freshly roasted coffee constantly “breathes,” and your packaging must continuously adapt to this change 24/7.
I often see this: when buyers purchase coffee bags from China, the bags look fantastic, but whether they use valves, the quantity of it, or the location of the valves is frequently overlooked. The result is that the pouches bulge, the seals are deformed, or the coffee tastes worse by the time it reaches the shelf.
In this guide, I’ll walk you through how one-way degassing valves really work, when they are essential (and when they are not), and how to choose between internal and external valves and the best valve positions for your filling line. The goal is simple: lock in aroma without blowing up bags or your packaging budget.
The Chemistry of CO2 Off-Gassing
Freshly roasted coffee is like a tiny gas factory! The roasting process traps a lot of carbon dioxide inside each bean, and that gas keeps pushing to get out for days or even weeks.
From a packaging view, this creates a strange problem. You need a bag that keeps oxygen out but also lets CO2 escape. That is exactly what a one-way degassing valve does: it opens when the pressure inside the bag is high, releases gas, then shuts again to block outside air.

Why roasted coffee behaves like a “gas factory”
When coffee is roasted, its cells open, creating a porous network. Inside that network:
CO2 forms during roasting and gets trapped in the cells.
After roasting, the gas slowly diffuses out of the bean into the bag’s headspace.
At the same time, oxygen tries to move in and attack the oils and aroma compounds.
Light, medium, and dark roasts degas at different speeds:
Light roast: tighter cell structure, slower CO2 release.
Medium roast: balanced release.
Dark roast: more cracks and pores, very fast degassing.
Grind size also changes the picture. Whole beans release gas slowly. Ground coffee has a huge surface area, so it can dump most of its CO2 in hours, not days.
Here’s a simple view you can share with your roaster or packaging team:
| Roast / Format | Typical degassing time (whole bean) | Typical degassing time (ground) | Valve need by bag size |
|---|---|---|---|
| Light roast | 7–14 days | 1–3 days | Strongly recommended for 1 kg+, almost a must for 2 kg+ |
| Medium roast | 5–10 days | 1–2 days | Recommended from 500 g upward, essential for 1–2 kg+ |
| Dark roast / espresso | 2–7 days | Hours–1 day | Critical for anything above 500 g |
In my experience, for small packages (250-500 g) of coffee beans, the degassing valve is mainly a branding move. Since the packaging won’t burst, the valve’s function is more like allowing customers to “little press” it and smell the aroma of the coffee beans.
For 500–1000 g, the bag can swell a lot, especially with dark espresso roasts and hot storage or shipping. A single valve is usually enough.
For 2 kg and above, a valve is no longer optional. At this size, one heavy roast batch can generate enough gas to seriously stress seals. I’ve seen roasters use two valves on very big bags so pressure can escape quickly.
How CO2 can protect your coffee (and also destroy your bag)
CO2 is not only a problem. Inside a sealed bag, it actually protects the coffee:
It pushes lighter oxygen out through the valve.
It creates a CO2 “blanket” around the beans, which slows oxidation. MTPak Coffee
But if gas has no way out, two things happen:
The bag balloons.
The weakest point fails first — usually a side or top seal.
So a good one-way valve is like a safety valve and a freshness tool in one. It must open at the right internal pressure, release enough gas, then shut tight again so outside air and moisture cannot come back in. Modern coffee valves are designed exactly this way: they open only when the pressure inside exceeds a set level, then close once the pressure drops.
When a valve does not add much value
There is one nuance I always share with buyers.
For small-batch, small bags (200–500 g), the CO2 volume is not large. If the coffee is roasted and rested properly before shipping, the bag is unlikely to burst. In that case, a valve is more about marketing and convenience than safety.
At the same time, because the valve is literally a hole with a controlled “gate,” it can also be a fast escape path for aroma during long, hot transport. I have seen brands that ship small batches by air, with short transit times, decide to skip the valve to keep aroma trapped inside.
So my rule of thumb looks like this:
| Bag size | Typical use case | Valve recommendation |
|---|---|---|
| 200–500 g | Retail bags, direct-to-consumer | Optional but nice; focus on barrier and zipper |
| 500–1000 g | Café supply, online orders | Recommended, especially for dark roasts |
| 2 kg and above | Roastery or distributor bulk bags | At least one valve; often two valves |
You can also visit our coffee packaging page to learn more, or click the “contact” button in the upper right corner to contact us directly. We’d be happy to help you with anything.
Internal vs. External Valves: A Performance Comparison
When you start discussing valves with a Chinese packaging supplier, they will often ask: internal valve or external valve? filtered or unfiltered? plastic or compostable? If these terms feel confusing, you’re not alone.
I like to break the decision into three simple questions: how do you pack, what do you pack (whole bean or ground), and what are your sustainability goals? Once you answer these, the “right” valve type becomes much clearer.
Internal vs external: which style fits your setup?
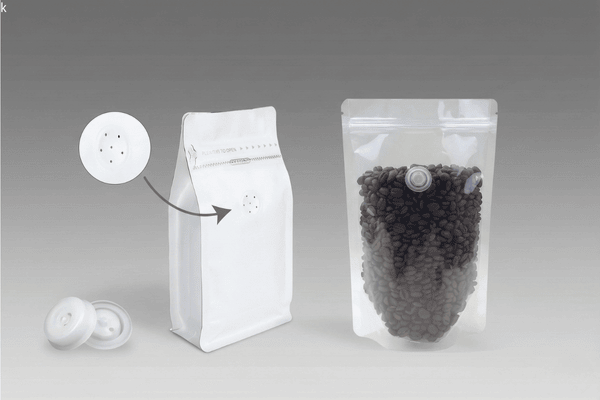
Internal valves are welded on the inside of the film roll before the pouch is formed. Tiny lasers or pin holes in the film allow gas to reach the valve.
Best for automatic VFFS / premade pouch lines.
Hidden from the outside, so the bag looks clean and premium.
Protected from damage during shipping.
External valves sit on the outside of the finished bag like a small “button” or patch.
Good for small roasters using pre-made bags who apply valves manually or with a simple table-top machine.
Easy to add after the bag is made, no need for a complex applicator.
More visible and more likely to catch during rough handling.
Here’s a quick comparison you can show to your team:
| Feature | Internal valve | External valve |
|---|---|---|
| Application | Pre-applied to film on the roll | Applied to finished bags |
| Best for | High-speed automated lines | Small batches, manual/semi-auto packing |
| Look & branding | Hidden, clean face of the pouch | Visible “button” on the surface |
| Damage risk in transit | Low | Higher (can snag or get pressed) |
| Upfront equipment cost | Higher (valve applicator on the line) | Lower (hand / bench applicator) |
The choice of air valve mainly depends on your packaging method. However, for aesthetic reasons, most brands are now packaged in pouches with an Internal valve. There are very few brands on the market that offer pouches with an External valve, this will gradually be phased out.
Filtered vs unfiltered: whole bean vs ground coffee
The second choice is filtered vs unfiltered:
Filtered valve: includes a paper or mesh filter under the valve to stop coffee fines.
Unfiltered valve: no filter, only suitable when no fine dust is present.
For whole beans, an unfiltered valve is usually fine. Bean size is large and will not block the valve.
For ground coffee, a filtered valve is almost mandatory. Without a filter, coffee dust can slip into the valve, sit between the disc and base, and stop it from closing properly. That turns a one-way valve into a two-way leak path, which kills shelf life.
Plastic, recyclable, or compostable valves?
Now let’s talk about materials.
Standard plastic valves (PP or PE) are stable and low cost. They are still the most common choice.
Recyclable mono-material valves are designed to work with mono-PE bags, so the whole pack can enter one recycling stream. Companies like MTPak Coffee now offer fully recyclable, BPA-free degassing valves that can be recycled with the rest of the coffee pouch. MTPak Coffee
Compostable valves (for example, Wipf’s WICOVALVE W606E) are built to meet EN 13432 when paired with compostable laminates. They are a good fit for brands that use kraft/PLA or other bio-based coffee bags. wipfdoypak.com
From China, you can now source all three types: classic plastic, recycle-ready, and compostable. Cost increases as you move from plastic → recyclable → compostable, so I usually suggest:
Use recyclable valves for mainstream SKUs where retailers care about sustainability.
Use compostable valves only when your whole pack is certified compostable and your market has access to composting facilities.
From my side as a packaging supplier:
For most export coffee brands, an internal filtered plastic valve on a high-barrier pouch is still the best balance of performance, look, and cost.
If your brand message is very eco-focused, a recyclable mono-PE pouch with PE-based valve is a strong upgrade.
Compostable valves are great on paper, but they need more testing. Heat, humidity, and long sea shipping can stress these materials, so always test real shipments first.
If you are interested in our high-barrier stand-up pouches, please visit our stand-up pouch page.
Valve Placement for Automated Filling Lines
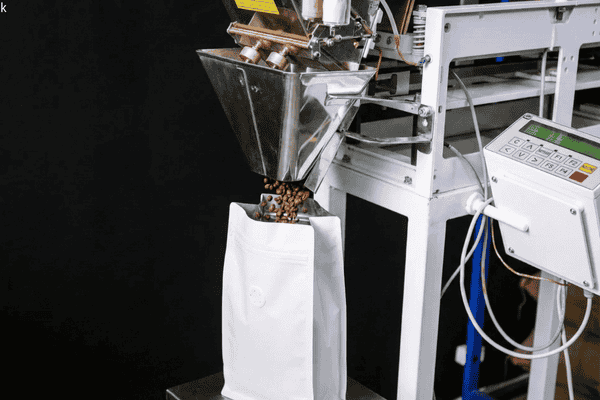
Even with the right valve type, bad placement can ruin the effect. I often see nice pouches, good valves, and then the valve is in the wrong place for the machine or the product.
The result? Crushed valves, valves hidden under retail labels, or one corner of the bag that never fully vents. Good valve placement is where engineering and design need to talk to each other.
Basic rules for valve position on coffee pouches
When you design a coffee pouch, think about three things:
Headspace: Gas needs space above the beans to collect.
Valve clearance: Filling jaws, clamp bars, and printers must not crush or block the valve.
Stacking and shipping: Cartons must not press directly on the valve in a way that keeps it open.
A simple starting point for many stand-up pouches:
Place the valve on the front panel, centered left–right.
Keep it 25–40 mm below the top seal (under the zipper if there is one).
Keep it away from tear notches and euro-holes.
For flat valve bags or side-gusset bags, brands often place the valve in the front upper third, again clear of the main seal area.
Here is a quick guide you can share with your machine supplier and your Chinese bag supplier:
| Bag style | Typical valve position | Notes for automation |
|---|---|---|
| Stand-up pouch (doypack) | Front panel, 25–40 mm below top seal | Keep clear of zipper sealing jaws |
| Side-gusset bag | Front panel, upper third | Avoid vertical seal area |
| Flat bottom bag | Front upper third, sometimes on back panel | Check label area to avoid covering valve |
| 2 kg+ bulk bag | One valve each side or front + back | Two valves often needed for fast venting |
Special care for large bags and fast lines
Earlier I mentioned that 2 kg and above often need two valves. This is even more true when:
The roast level is dark.
The line speed is high.
The bags go straight into boxes with minimal headspace.
On fast automated lines, you also need to think about how the bag travels:
If the conveyor or forming shoulder presses flat against the valve area, it can deform the valve and make it “lazy” (slow to open or close).
If the valve sits where coding or labeling equipment operates, there is a risk of labels covering the vent holes.
When you buy from China and plan mass production, I always suggest this simple process:
Share your machine drawings and bag dieline with the supplier.
Ask the factory to mark the proposed valve position on a PDF or 3D mock-up.
Produce a small pilot run (even 500–1000 bags) and run them at real speed on the line.
Check for puffy cartons, crushed valves, or leaking bags after 1–2 weeks.
Keeping dust away from the valve
Ground coffee and fine espresso grinds create a lot of dust. If you place the valve too close to the filling zone, that dust can blow straight into the valve area.
Two simple tips:
Use filtered valves for ground coffee, as we discussed earlier.
Place the valve just far enough from the fill funnel and product impact zone, so fines do not directly hit the valve holes.
If you work with a roaster who fills very fine espresso, this is even more important. The right combination (filtered valve + smart placement) can cut a lot of slow leaks and “mystery” stealing issues that are very hard to trace.
How to choose the right valve setup for your line
Here is a simple decision path you can follow with your Chinese supplier and your machine maker:
Define the product: whole bean or ground, roast level, fill weight per bag.
Confirm the bag style: stand-up pouch, side-gusset, flat bottom, or bulk bag.
Share machine details: VFFS or premade-pouch, line speed, sealing pattern, where the grippers hold the bag.
Select valve type: internal vs external, filtered vs unfiltered, standard vs recyclable/compostable.
Agree on valve position: use a marked dieline and get both sides to sign off before cylinder or plate making.
Run a test batch: check valving, seals, carton stacking, and real transport if possible.
If you follow this step-by-step approach, you avoid the classic situation where the artwork is final, the cylinders are paid, bags are made… and then you discover the valve is sitting exactly where your date coder needs to print.
Conclusion
A one-way degassing valve looks tiny, but it controls how your roasted coffee arrives, tastes, and ages. When you match valve type, quantity, and position to your roast profile and line setup, you protect aroma, avoid burst bags, and give your brand a more reliable, premium feel.